I attended a weekend photography conference last weekend. This conference is called RMSP Weekends and it is put on by the Rocky Mountain School of Photography. I highly recommend checking it out if it comes to your area as I feel I learned a ton!
The sessions I attended for Day One
- Understanding Exposure: Using the Zone System for Color
- Workflow: Processing Your Images with Adobe® Lightroom®
- Light: Creating Mood and Dimension
- Keeping Your Photography Fresh
The notes I took
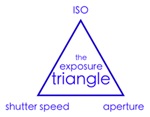
Understanding Exposure
Tim Cooper - Tim Cooper Photography
Reflected Meter
Middle Grey - Average Reflectance
Camera automatically turns white into a gray and black into a gray
Meter Types
- Center-Weighted Meter
- Partial Meter
- Spot Meter
- Evaluative/Matrix Meter (used in P-mode)
Exposure Meter is usually at the bottom or on the side of the frame
Auto-Bracketing (used for HDR)
Checking Exposure
- Find average brightness
- Zero out meter
- Check highlights
Zone III - VII = 5 stops of latitude
Aperture priority mode - may need to use the exposure compensation dial in addition to all the normal setup. Need to try using Manual Mode as the norm
Biggest take-away: EXPOSE FOR YOUR MID-TONES AND CHECK OUR HIGHLIGHTS!!!!!!!!!!!!!!!
--
Processing Your Images With Adobe LightRoom
Tim Cooper - Tim Cooper Photography
Library Module
Shortcuts
Library filter
keywording
Apply During Import
- File Renaming
- Presets
- Meta Data Template
Note: This instructor strongly suggests putting LightRoom catalog and all photos on a large, external hard drive so you can work with them on any machine that has LR installed. Backup that device onto two other HD's. Something to consider.
Space bar, blows up a photo on the screen
Crop tool not only crops a photo, but you can apply a print size to it as well. (ie, 5x7, 8x10, etc)
Saving "Develop" presets.
--
Lighting: Creating Mood and Dimension
Tony Rizzuto
Brightness is defined as the amount of light in a scene
ISO,shutter speed and aperture affect the amount of light
Contrast is defined as the difference in brightness between the highlights and the shadows.
Really dark shadows (no detail) - blocked out
Really bright highlights (no detail) - blown out
The human eye can see 15 stops of brightness in a scene
stop = change in brightness (x2) => 2, 4, 8, 16, 32, etc
B&W negatives contain 10 stops
Contrast is created by 3 things: the direction of the light source, the size of the light source and the distance of the light source.
Types of light
- Front light (0-45 degrees) is considered low contrast because there are no shadows.
- Side light (45-90 degrees) is considered high contrast
- Back light is considered low contrast.
- Diffuse light - light falls on the subject from many directions.
Larger the light source, the lower the contrast
Farther the light source is, the higher the contrast. So while the Sun is very large, it is very far away, making it high contrast.
Tools for Modifying Contrast
- Scrim or Diffuse disk (light source | scrim | subject)
- Reflector (light source | subject | reflector) (silver=cool, gold=warm, white=neutral, black=absorbs - deepen shadows)
- Fill flash
Flash and direction - bounce the flash (wall, ceiling, floor)
Using Fill Flash
- Create exposure based on the ambient light
- Make sure the shutter speed does not exceed the camera's sync speed
TTL - Through The Lens
White Balance
- Cloudy - adds yellow to the scene
- Open Shade - Adds yellow to the scene
- Tungsten - adds blue to the scene
- Daylight - No correction to color. Ideal for a sunny/cloudless day.
NOTE: Since the daylight WB makes no correction to color, it is great for sunset, sunrise and night photography.
NOTE: To get a starburst effect, close down to f/16
Caucasian skin tone is 1 stop brighter than normal.
Recommended flash - SB-600
Recommended gear - Gary Fong Puffer Pop up Flash Diffuser
--
See next post for Day Two